

To extend the life of your dryer in Fulshear, keep each load no more than ¾ full, clear the lint screen before or after every cycle, and keep the vent clear. Lint buildup or a blocked vent can slow drying, reduce efficiency, and create a fire hazard. Good airflow and sensible loads help your dryer work as it should.
Long drying times can be frustrating, especially when the laundry keeps piling up. A clogged lint screen is one possible cause, but the vent and the way clothes move through the drum matter too. Small, consistent habits can help you spot problems early and avoid putting unnecessary strain on the appliance.
This guide explains how to load laundry, clean the lint screen, inspect the vent and washer hoses, and finish cycles properly. You’ll also learn which signs suggest routine cleaning may not be enough, so you can take the right next step to keep laundry drying efficiently.
Key Takeaways
- Leave room for laundry to move freely instead of packing the washer or dryer tightly.
- Clear the lint screen every cycle, and wash it regularly to remove residue that can restrict airflow.
- Check washer hoses for wear and keep the dryer vent clear to help prevent slow drying and overheating.
- Let cycles finish as designed, and pay attention to repeated interruptions or changes in drying performance.
- If cleaning and airflow checks don’t resolve ongoing dryer trouble, professional repair can help identify the cause.
1. Avoiding washer and dryer overloads
To extend the life of your dryer in Fulshear, give each load room to move. A tightly packed drum can bunch clothes together and limit their exposure to warm air. The result may be uneven drying and another cycle. Adjusting the load is a simple step to take before pressing Start.
Use the three-quarter rule: fill the washer or dryer drum no more than ¾ full. Clothes need room to tumble, rinse, and dry. If a load reaches close to the drum opening, remove several items and run them separately. Follow your appliance manual’s load guidance, especially for bulky pieces.
Overloading a washer can strain its drum, unbalance the load, and put stress on the motor. Towels mixed with lightweight shirts, for example, may shift unevenly during spinning. If the machine starts thumping, pause it and redistribute the garments. A balanced load helps prevent the repeated jolts caused by uneven weight.
Sort loads by fabric and bulk, not just by how much laundry fits. Wash heavy towels together and separate them from a small group of lightweight garments. Avoid cramming bedding around other items. If a blanket fills most of the drum, wash it alone so it can move freely through the cycle.
Check that all four feet of each appliance sit firmly on the floor. A washer or dryer that wobbles or shakes can damage internal parts over time. If movement starts during a cycle, stop the machine and check whether the load is uneven. Confirm the appliance is stable before restarting.
Fulshear’s humidity can leave air-dried laundry feeling damp, but adding more items to the dryer won’t help. Keep loads within the ¾-full limit and allow clothes to tumble freely. If items still feel damp, check the load size and airflow rather than packing in more laundry or repeatedly starting new cycles.
Build a quick check into laundry day: sort by weight, fill each drum to no more than ¾, and listen for shaking. If one load repeatedly shifts or causes loud thumping, reduce its size and redistribute the items. With proper maintenance, washers and dryers can last 10-15 years or more, making careful loading a practical daily habit.
Before starting a cycle, check how much of the drum the laundry occupies. Keep the load no more than ¾ full, leaving room for garments to move freely. If the drum looks crowded, remove a few pieces for a separate load. This quick check helps you load the washer and dryer consistently.
2. Cleaning the dryer lint filter
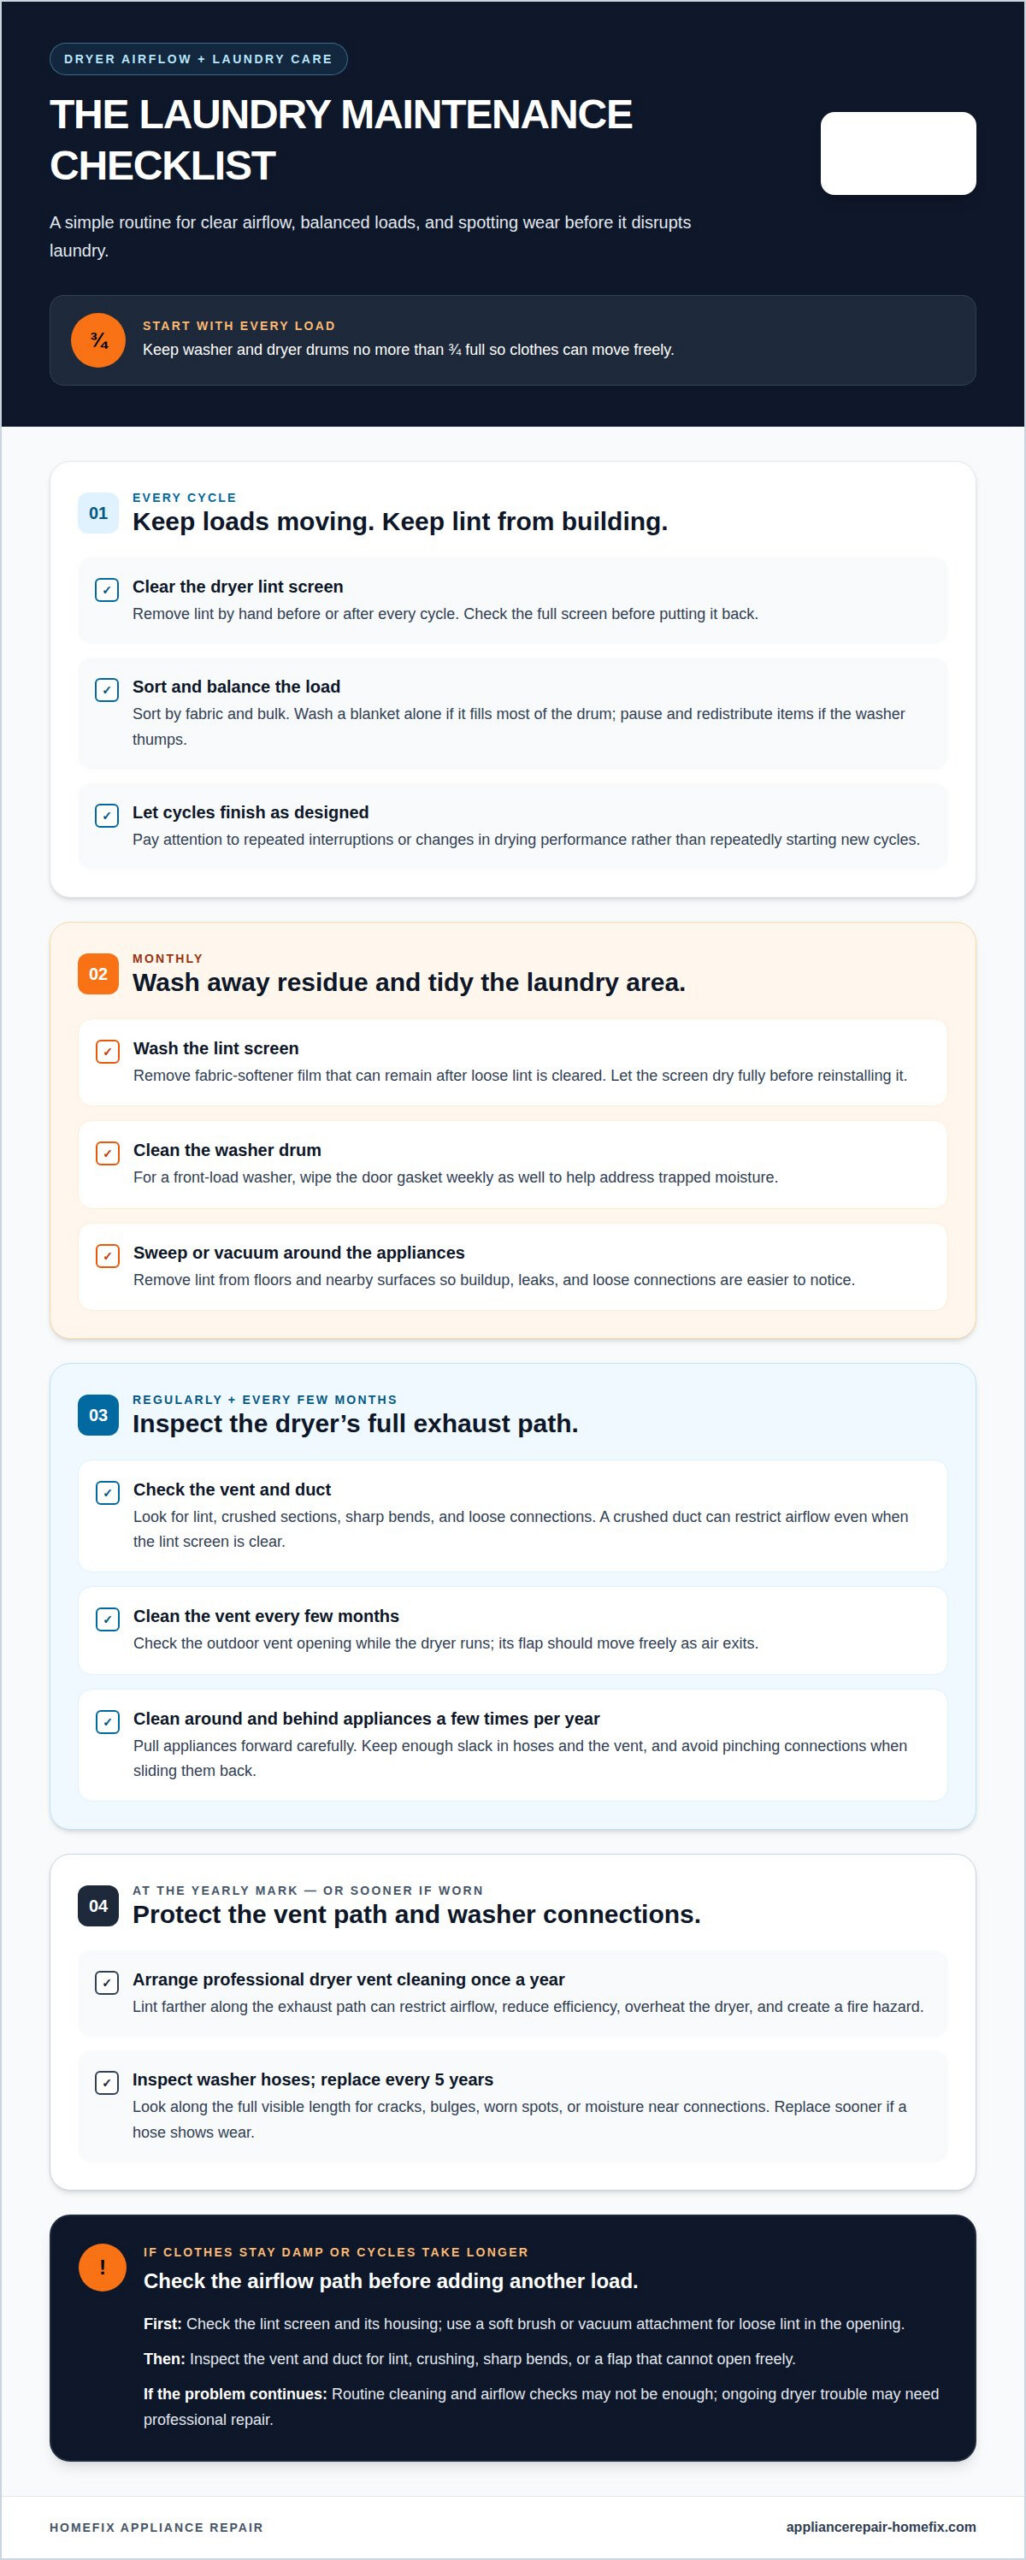
Clear the lint screen before or after every dryer cycle. Pull it out, remove lint by hand, and check the entire surface before replacing it. A thin coating may remain after loose lint is gone. Wash the screen monthly to remove fabric softener film, then let it dry fully before reinstalling.
A clogged screen restricts airflow through the dryer, reducing efficiency and potentially lengthening drying times. If a normal load stays damp, check the screen first, then look for lint around its housing. Use a soft brush or vacuum attachment to collect loose lint in the opening. Avoid pushing debris farther into the appliance.
The vent and exhaust duct need attention too. Inspect the vent regularly for lint, crushed sections, or a flap that cannot open freely. Clean the vent every few months, and arrange professional dryer vent cleaning once a year. A clogged vent restricts airflow, can overheat the dryer, reduces efficiency, and creates a fire hazard.
For routine maintenance, clear the lint screen every cycle, wash it monthly, and keep the vent clear. Also clean the washer drum monthly and wipe a front-load washer’s door gasket weekly. These habits address lint, residue, and trapped moisture throughout the laundry area, not just on the dryer’s visible screen.
Keep the laundry area clean, too. Sweep or vacuum around the washer and dryer monthly, removing lint from the floor and nearby surfaces. Pull appliances forward a few times per year to clean behind them, taking care not to strain hoses or the vent connection. A clear area makes leaks, loose connections, and lint buildup easier to spot.
In Fulshear, follow a practical schedule: clean the screen every cycle, wash it monthly, inspect the vent regularly, and clean it every few months. Professional vent cleaning is recommended once a year. These tasks work together because lint can collect both on the screen and farther along the exhaust path.
A clogged vent can cause the dryer to overheat, dry clothes inefficiently, and create a fire hazard. Don’t treat repeated long cycles as a lint-screen problem alone. Check the screen and vent path, and address persistent airflow trouble before running another load.
3. Inspecting washer hoses and dryer vents
Include washer hoses and the dryer vent in laundry-area maintenance. A leaking hose can leave water around the washer, while a restricted vent can slow drying. Look behind both appliances for visible wear, crushed sections, or lint buildup. A brief inspection can catch problems before they disrupt laundry.
Check washer hoses for cracks, bulges, worn spots, and moisture near their connections. Replace hoses every 5 years, or sooner if they show wear. Look at the full visible length, not only the ends beside the washer. If a hose is bent sharply behind the machine, adjust the appliance carefully to reduce pressure on that section.
Before moving a washer or dryer, make sure its hoses and vent have enough slack. Pull appliances forward a few times per year to clean behind them, then avoid pinching a hose or duct as you slide them back. Keep connections visible so you can spot fresh moisture or lint.
For the dryer, inspect the duct between the appliance and the wall. Look for crushing, sharp bends, loose connections, and lint around the joints. A crushed duct can restrict airflow even when the lint screen is clear. Check that the duct keeps its shape after returning the dryer to its usual position.
Check the outdoor vent opening while the dryer runs. Its flap should move freely as air exits. Notice whether lint gathers around the opening or airflow seems weak. Clear visible lint from the exterior and arrange vent cleaning if buildup appears inside the duct. A clean exterior flap doesn’t mean the entire vent route is clear.
Reduced airflow affects both drying performance and safety. According to the U.S. Environmental Protection Agency, a manufacturer indicated that reduced airflow may reduce overall energy efficiency by over 30% and could be a fire hazard. Treat repeated long cycles, overheating, or restricted airflow as reasons to inspect the full vent path.
Keep each inspection practical: check washer hoses for wear, confirm connections stay dry, and look for bends or lint along the dryer duct. Replace worn hoses every 5 years or sooner if needed. If the dryer vent remains blocked after visible lint is cleared, stop relying on surface cleaning and address the obstruction along the duct.
4. Letting cycles finish
Let the dryer complete its selected cycle before removing clothes. The final minutes may continue drying or complete the programmed finish. Opening the door early can leave thick items damp, even when lighter pieces feel dry. Check the center of a towel before deciding the whole load is ready.
Choose a cycle that matches the load before pressing Start. Use care labels to separate items that need different drying approaches. Everyday cottons may need a different setting from delicate garments—and for high-end fabrics that should bypass home appliances entirely, specialized dry-cleaning services such as thawbwateeb.com offer tailored garment care. If you’re unsure which option to use, follow the cycle descriptions in your appliance manual rather than interrupting the cycle midway.
Repeatedly stopping and restarting makes it harder to judge whether clothes are dry. If a cycle ends and a garment still feels damp, check its seams, waistband, or folded layers. Then decide whether a short additional run suits its care instructions. Don’t keep restarting the full load without identifying which items remain wet.
Some dryers offer automatic and timed settings. If yours has both, choose the option suited to the fabric and the result you need. Automatic settings use the appliance’s controls to end a cycle, while timed settings run for the duration you select. Follow your model’s manual for instructions on each option.
Pausing mid-cycle can make sense if you need to remove an item or untangle a load. Open the door carefully, make the adjustment, and restart the cycle. Don’t rely on pauses as the normal way to finish laundry. Removing one dry shirt, for example, doesn’t mean the remaining jeans and towels are ready.
Watch dryer performance over several loads. If the same cycle consistently leaves clothes damp, note the load type and setting. Compare a small load of similar fabrics with a mixed load. This can help show whether the issue relates to the cycle choice, the load, or the dryer itself.
Treat the end signal as a prompt to unload and sort, not proof that every item is equally dry. Check bulky or layered pieces individually, then fold or hang them according to their care labels. If a cycle repeatedly stops early, runs unusually long, or leaves ordinary loads wet, note what happens. That detail can help narrow down a recurring dryer problem.
5. How often should you clean a dryer lint screen and vent?
Use a simple schedule: clear the lint screen before or after every cycle, wash it monthly, inspect the vent regularly, and clean the vent every few months. Professional dryer vent cleaning is recommended once a year. Put these tasks on a calendar so routine maintenance doesn’t slip between laundry days.
After each load, remove the screen and clear away collected lint. Check the mesh and edges before reinstalling it. Once a month, wash the screen to remove fabric softener film, then let it dry completely before putting it back. This monthly wash complements, but doesn’t replace, clearing lint after every cycle.
Inspect the vent regularly, including the visible duct behind the dryer and the outdoor opening. Look for lint buildup, crushed sections, or a flap that cannot open freely. Clean the vent every few months. A clear exterior opening doesn’t show whether lint has collected farther inside the duct.
Arrange professional vent cleaning once a year, in addition to cleaning the vent at home every few months. Professional cleaning addresses lint along the vent path, while regular visual checks can reveal changes between cleanings. Note the date of the last professional cleaning on your laundry calendar.
Use the calendar as a baseline, then watch for changes in dryer performance. If clothes take longer to dry, airflow seems weak despite a clean screen, or lint gathers around the outdoor opening, inspect the vent sooner. These signs can tell you when to act before the next scheduled check.
A household checklist can make this schedule easier to follow. Mark the lint screen after each load, set a monthly reminder to wash it, and note regular vent inspections. Add the yearly professional cleaning to the same calendar. Each task then has its own timing rather than relying on one general reminder.
After cleaning, check that the screen is seated correctly and the vent connection is secure. Run the next load as usual and notice whether airflow at the outdoor opening seems unobstructed. If lint returns quickly or drying remains slow, don’t assume another screen wash will solve an underlying vent issue.
If dryer trouble continues after routine screen and vent care, arrange professional dryer repair.
A clean screen is only part of the airflow check. Lint buildup in the vent or lint trap can cause long drying times. Washing the lint screen monthly removes fabric softener film, while changes in drying time can signal a problem. If the screen is clear but drying remains slow, consider lint farther along the vent instead of repeating the same cleaning.
Good laundry habits support appliance performance. Fill washer and dryer drums no more than ¾ full so clothes have room to move. Front-load washers need more frequent gasket cleaning than top-load washers because they retain moisture. For HE washers, use high-efficiency detergent in the recommended amount. Check that all four feet of each washer or dryer touch the floor firmly. A stable appliance is easier to use safely and consistently. These checks complement, rather than replace, routine lint-screen and vent care.
HomeFix: Refrigerator Repair
HomeFix provides dryer repair when slow drying, unusual noises, or cycle problems continue despite routine care. If you’ve checked the lint screen and vent but your dryer still struggles, repair can help identify the underlying issue. HomeFix also repairs washers that shake, drain poorly, or show other persistent problems.
Note when the trouble began and which cycles are affected. These details can help explain the problem and support a focused repair visit. If routine maintenance hasn’t resolved a dryer or washer issue, contact HomeFix to discuss the next step.
Keep Your Laundry Routine Working for You
Make dryer care part of your regular laundry routine, not something you remember only after drying slows. Calendar reminders help you keep maintenance consistent and notice changes before they become recurring disruptions. If the dryer still performs poorly after basic upkeep, note which loads are affected and whether the cycle ends normally. Those details can make the next step more focused.
Small, steady habits are a practical way to extend the life of your dryer in Fulshear. When a problem persists, professional repair can help identify whether the cause lies inside the appliance rather than in your routine. HomeFix repairs dryers, washers, and refrigerators.
Keep your routine simple, act when performance changes, and make laundry day easier to manage.
Frequently Asked Questions
Why does my dryer take so long to dry clothes?
Restricted airflow, an overloaded drum, or an unsuitable cycle can slow drying. To narrow down the cause, compare a smaller load of similar fabrics with one that takes longer. If both perform poorly, check whether the problem persists after routine screen and vent care. Note the selected cycle and which items remain damp. This pattern can help distinguish a load issue from a dryer problem that needs attention.
How do you safely clean a dryer vent yourself?
Switch off and unplug the dryer before accessing its vent connection. Follow the appliance manual, then remove lint from accessible duct sections with a vent brush or vacuum attachment. Work gently to avoid pushing debris farther into the duct or dismantling the dryer. Reconnect the vent securely before using the appliance. If the duct is difficult to reach or lint remains trapped, stop and arrange professional cleaning.
How can you tell if a dryer vent is clogged or unsafe?
Repeatedly long drying cycles can signal restricted airflow, especially after you’ve cleaned the lint screen. Check whether the outdoor vent flap opens while the dryer runs, and look for lint around the opening. A blocked vent can cause overheating and create a fire hazard. If airflow remains weak or the dryer overheats, stop running loads and address the blockage before using it again.
When should you repair or replace a dryer?
Compare the repair estimate with the cost of a replacement and consider how often the dryer needs service. If a repair costs more than 50% of a new unit’s price, replacement is usually more cost-effective. Needing a technician more than once a year can also be a sign that upgrading may make better financial sense. Weigh those factors alongside the dryer’s condition and recurring symptoms.
Does dryer load size or cycle choice affect its lifespan?
Yes. Loads that restrict tumbling or require repeated extra cycles can add avoidable strain during regular use. Match the setting to garment care labels, and avoid mixing fabrics that need different drying approaches. Check bulky items separately rather than assuming a cycle suited to lighter clothes has dried them. If suitable loads and settings still need repeated drying, investigate the cause instead of continually adding cycles.


