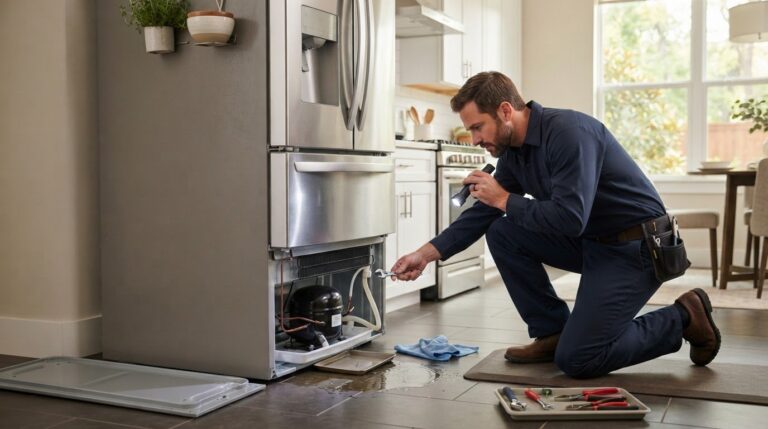
A single coil-cleaning schedule doesn’t fit every home. In homes with pets, heavy kitchen traffic, or construction dust, inspect and clean condenser coils every 3 to 6 months; routine cleaning isn’t typically needed in a normal home operating environment. If you’re learning how to clean refrigerator coils safely in Pearland, start with your refrigerator’s Use and Care Guide for the coil location and model-specific instructions.
It’s easy to overlook refrigerator coils, but dust and debris can collect around them. To clean them safely, disconnect power first, then use a suitable vacuum attachment or soft-bristle coil brush without bending the fins or tubing. This guide explains what condenser coils do, how to check whether your model needs cleaning, and when to leave the work to a certified technician. You’ll have a practical routine for cleaning accessible coils without disturbing nearby parts.
Key Takeaways
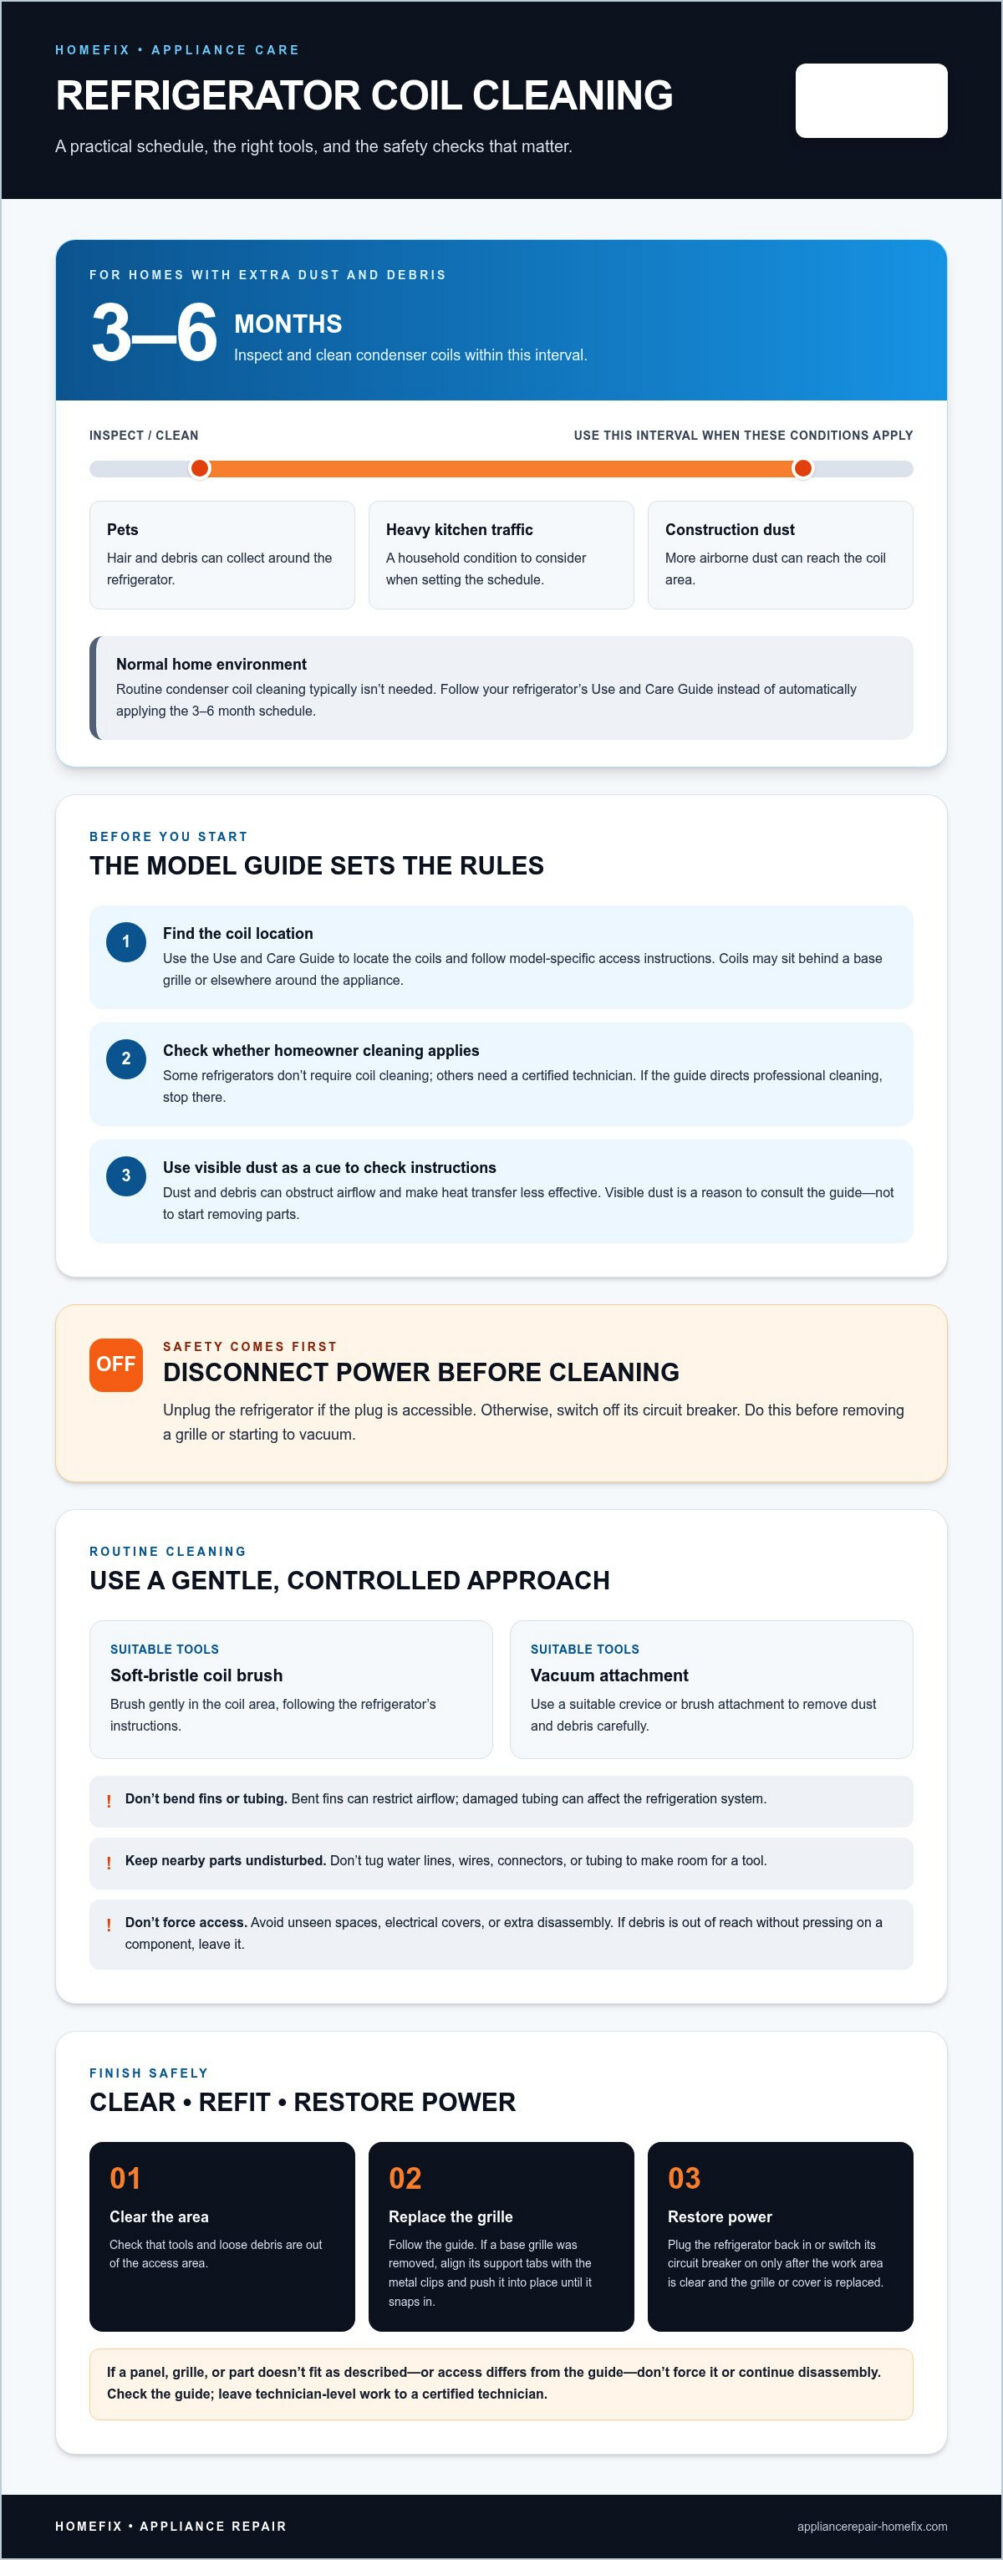
- Match coil-cleaning frequency to your home: inspect and clean every 3 to 6 months if you have pets, heavy kitchen traffic, or construction dust.
- Check your refrigerator’s Use and Care Guide for the coil location and any model-specific cleaning instructions.
- Disconnect power before cleaning, and take care not to bend coil fins or tubing or disturb dispenser water lines.
- Use a soft-bristle coil brush or a vacuum with a crevice or brush attachment to remove dust and debris carefully.
- Contact HomeFix for Refrigerator Repair if your refrigerator needs repair or its coils require work beyond routine cleaning.
Condenser coil function and cleaning benefits
- Identify the condenser coils. Find your refrigerator’s Use and Care Guide and follow its instructions to locate the condenser coils. Depending on the model, they may sit behind a base grille or elsewhere around the appliance. Don’t assume every refrigerator has coils homeowners should clean: some models don’t require coil cleaning, while others need a certified technician. The guide will tell you whether this maintenance applies to your refrigerator.
- Understand the coils’ role. Condenser coils release heat from the refrigeration system into the surrounding air. Dust and debris can obstruct airflow around the coils, making heat transfer less effective and potentially making the refrigerator work harder to maintain its internal temperature. Visible dust is a reason to consult your model’s cleaning instructions, not a reason to start removing parts.
- Inspect before choosing a cleaning method. Use the guide’s diagram to locate the coils and identify any grille or cover involved. Look for dust, lint, and debris without pulling on nearby parts. Check whether the guide allows homeowner cleaning before proceeding. If it says a certified technician should clean the coils, stop there instead of trying to reach them behind a cover. This model-specific check helps prevent routine maintenance from turning into unnecessary disassembly.
- Protect nearby components during cleaning. If your refrigerator’s instructions allow cleaning, focus on the coil area and surrounding dust. Avoid bending the fins or tubing, which could affect airflow or the refrigeration system. Don’t disturb water lines connected to an ice maker or dispenser. If a line crosses the access area, don’t pull it aside to make room. Follow the guide’s directions instead.
- Use cleaning as an inspection opportunity. After removing dust as directed, check for remaining debris and replace the grille as instructed. If you removed a base grille, align its support tabs with the metal clips, then push it into place until it snaps in. Keeping the coil area clear supports heat release and helps the refrigerator operate as intended. If the guide says cleaning isn’t needed, leave the coils undisturbed.
Power-disconnection safety
Damaging refrigerator coils can bend fins or tubing and interfere with the appliance’s operation. Cleaning before disconnecting power also puts energized electrical components near your hands and tools.
- Disconnect power before starting. Unplug the refrigerator or switch off its circuit breaker before cleaning the condenser coils. Do this first, before removing a grille or starting to vacuum. If the plug is accessible, unplug the appliance. Otherwise, switch off the circuit supplying the refrigerator. Don’t begin until power is disconnected.
- Use the refrigerator’s guide to plan access. Find the Use and Care Guide and follow its model-specific instructions before opening a panel or removing a grille. It can show where the coils are and how to handle an access cover. Some models don’t require coil cleaning; others require a certified technician. If your guide directs professional cleaning, stop rather than reaching behind covers or near electrical parts.
- Keep tools away from wires and connections. Once power is disconnected and the guide allows access, work only in the designated coil-cleaning area. Don’t push a vacuum nozzle or brush into unseen spaces. Avoid pulling, shifting, or pressing on wires, connectors, tubing, and water lines. If a line crosses the space you need to reach, don’t tug it aside. Follow the guide’s access instructions instead.
- Handle coils without force. Brush or vacuum gently. Don’t bend fins or tubing to clear a blocked spot or make more room. Bent fins can restrict airflow, and damaged tubing can affect the refrigeration system. If debris is out of reach without pressing on a component, leave it rather than forcing a tool into the gap.
- Stop if the access area differs from the guide. Refrigerator layouts vary, and a panel or component that looks removable may not be intended for routine cleaning. Don’t remove electrical covers or disconnect parts to reach hidden coils. Compare the exposed area with the guide. If accessing the coils would require steps beyond those described, stop and avoid further disassembly.
- Restore the refrigerator only after the work area is clear. Check that tools and loose debris are out of the access area. Replace any grille or cover as instructed. Then restore power by plugging the refrigerator back in or switching its circuit breaker on. If a part doesn’t fit as described, don’t force it; check the guide before restarting the appliance.
Recommended cleaning frequency
- Set your schedule by the conditions at home. In homes with pets, heavy kitchen traffic, or construction dust, inspect and clean condenser coils every 3 to 6 months. These conditions can bring more hair, lint, and airborne debris near the refrigerator. Choose a recurring reminder within that interval, then use each inspection to decide whether cleaning is due. Don’t automatically apply this schedule to every household.
- Use a different approach in a normal home. Routine condenser coil cleaning typically isn’t needed in a normal home environment. Rather than cleaning on a frequent schedule by default, follow your refrigerator’s Use and Care Guide. It explains whether your model needs cleaning and gives model-specific instructions. Don’t assume a schedule for a dustier environment applies to an ordinary household.
- Inspect when household conditions change. A new pet, frequent kitchen activity, or nearby construction can increase dust and debris around the refrigerator. If one of these conditions begins, adjust your reminder to the 3-to-6-month inspection and cleaning interval. For example, a home undergoing construction can use that schedule while construction dust remains part of the environment, then reassess when conditions return to normal.
- Check the model instructions before cleaning. Find your refrigerator’s Use and Care Guide and review the coil location and cleaning directions. Some models don’t require condenser coil cleaning; others can only be cleaned by a certified technician. A general household schedule doesn’t override model-specific instructions. If the guide says cleaning isn’t needed, don’t add the task without a reason.
- Record each inspection and its result. Note the inspection date, household conditions, and whether the coils needed cleaning. For a home with pets or construction dust, this record helps keep the next inspection within the recommended 3 to 6 months. In a normal home, it helps prevent unnecessary repeat cleaning. Use the same simple note after each check to track changes in dust or household activity.
- Make the routine fit your Pearland home. If you’re deciding how to clean refrigerator coils safely in Pearland, base the repeat schedule on household dust and activity, alongside your model’s guide. Keep the 3-to-6-month interval when pets, heavy kitchen traffic, or construction dust apply. If they don’t, consult the guide rather than continuing a high-dust schedule automatically. Reassess when household conditions change.
Tools for cleaning refrigerator coils
Coil locations vary by refrigerator model, so use its Use and Care Guide to find them. Follow the guide’s access instructions; some models require a certified technician to clean the coils.
- Choose a tool listed for coil cleaning. Use a soft-bristle coil brush, a refrigerator coil brush, or a vacuum with a crevice or brush attachment. These tools can remove dust without a hard implement. Start with one that fits the access area described in your refrigerator’s guide. Don’t use a tool that requires force or awkward pressure to reach the coils.
- Match the attachment to the opening. A crevice attachment can suit a narrow gap, while a brush attachment can collect loose debris across an exposed area. Check that the attachment fits the access space before cleaning. If the vacuum nozzle would press against tubing, choose a suitable brush instead. Keep the tool within the coil area and don’t push it into hidden spaces.
- Use a coil brush gently. With light strokes, guide a soft-bristle coil brush over reachable dust. Work only where the refrigerator’s instructions permit access. Don’t bend fins or tubing to make room for the brush. If the bristles can’t reach a dusty section without pressure, stop. The tool should remove accessible debris, not force its way through a crowded opening.
- Check the brush before each pass. Inspect the bristles and handle before bringing the brush near the coils. Use a soft-bristle coil brush, not a tool that could scrape delicate parts or press hard against them. Move slowly across the accessible surface, then check what remains. If a cover or nearby component blocks access, consult the guide rather than reaching around it.
- Position the vacuum attachment carefully. Choose a crevice or brush attachment that reaches visible dust without touching nearby wiring, tubing, or water lines. Keep the nozzle steady as you vacuum loose debris from the coil area. Don’t wedge it behind components or use it to shift them. If the opening is too tight for controlled movement, use a soft-bristle brush on reachable areas instead.
- Prepare tools before you begin. Set the brush or vacuum attachment within reach, then follow your guide’s instructions for access and disconnecting power. Having the tool ready helps you avoid reaching repeatedly around the refrigerator. Use one tool at a time and focus on visible, accessible dust. If your model’s guide calls for cleaning by a certified technician, don’t proceed with homeowner tools.
Vacuuming dust and debris from coils
For safe coil cleaning, follow your refrigerator’s Use and Care Guide, disconnect power, then remove accessible dust with a vacuum attachment or soft-bristle coil brush. Coil locations and cleaning directions vary by model, and some refrigerators require a certified technician.
- Confirm the model allows homeowner cleaning. Find the Use and Care Guide and identify the condenser coil location before opening a grille or panel. Follow the model’s access instructions exactly. Some refrigerators don’t require coil cleaning, while others can only be cleaned by a certified technician. If your guide calls for technician cleaning, don’t proceed with a vacuum or brush.
- Disconnect power before vacuuming. Unplug the refrigerator or switch off its circuit breaker before touching the access area. Keep the vacuum and its cord clear of water lines and other components. Don’t start while the refrigerator is connected to power. Disconnect power before removing a cover, reaching into the coil area, or using an attachment.
- Choose the right attachment. Use a vacuum with a crevice or brush attachment to remove dust around accessible coils. A crevice tool can reach a narrow opening; a brush attachment can collect loose debris across an exposed area. Choose one that fits without force. If the nozzle presses against tubing or wiring, don’t wedge it farther into the gap.
- Vacuum gently across the reachable area. Hold the attachment near visible dust and move it slowly along the coil area. Avoid scraping or pressing the nozzle against fins and tubing. If dust sits beside a water line, vacuum around it without moving the line. Don’t bend fins or tubing to reach an obstructed patch.
- Use a soft-bristle brush for stubborn loose dust. If the vacuum leaves debris on an accessible surface, sweep it gently with a soft-bristle coil brush. Keep strokes controlled and stop if the brush catches or requires pressure. Don’t push debris deeper into the refrigerator or force the brush past a cover. Follow your guide’s instructions for any removable grille.
- Finish by checking the area and restoring access. Look for loose debris around the cleaned section, then replace any grille as instructed. If the design uses support tabs and metal clips, align them and press the grille into place until it snaps in. Restore power only after the work area is clear and all covers are secure.
Get help with refrigerator problems
HomeFix: Refrigerator Repair
HomeFix provides Refrigerator Repair when cleaning doesn’t resolve a problem or the coils need professional attention. If your model’s guide directs a certified technician to clean the coils, avoid taking panels apart or reaching into hidden areas. Repair is also the right next step if the refrigerator continues to have trouble operating after routine maintenance.
Tell us what you observed, such as where dust was found and whether the guide allows homeowner cleaning. This helps focus the repair discussion on the refrigerator’s symptoms and maintenance history. For refrigerator issues in Pearland, HomeFix can help when the problem goes beyond safe, routine cleaning.
Contact HomeFix to discuss Refrigerator Repair.
Keep Your Refrigerator Ready for Everyday Use
Make coil care part of a practical home-maintenance routine guided by your refrigerator’s instructions and the conditions around it. For Pearland households, knowing how to clean refrigerator coils safely starts with choosing an approach that fits the appliance, not forcing a schedule or tool that doesn’t suit its design.
If the refrigerator still isn’t working properly after routine care, it may need repair rather than more cleaning. HomeFix offers Refrigerator Repair, along with Washer Repair and Dryer Repair, for essential household appliances that need attention.
Choose the next step that fits your appliance and keep your home running smoothly.
Frequently Asked Questions
How often should you clean the coils?
Inspect and clean condenser coils every 3 to 6 months in homes with pets, heavy kitchen traffic, or construction dust. For example, a home with a shedding pet can use a recurring calendar reminder within that interval. In a normal home operating environment, routine cleaning isn’t typically needed. Use the refrigerator’s Use and Care Guide to see whether its model needs cleaning and what instructions apply.
What tools and protective equipment are needed to clean refrigerator coils?
Use a soft-bristle coil brush, refrigerator coil brush, or vacuum with a crevice or brush attachment. The attachment should reach accessible dust without pressing against tubing, fins, wiring, or water lines. Keep the guide nearby to check the model’s access instructions. Disconnect power before working. The cleaning instructions provided here don’t specify additional protective equipment, so don’t substitute improvised tools or force access to hidden components.
Should you unplug a refrigerator before cleaning its coils?
Yes. Before cleaning, unplug the refrigerator or switch off its circuit breaker. Choose the method that works for your setup, and disconnect power before opening a grille or bringing a vacuum or brush near the coil area. If the plug is difficult to reach, use the circuit breaker. Restore power only after you’ve finished, cleared the work area, and replaced any grille as directed.
How often should refrigerator coils be cleaned?
The right repeat schedule depends on your home and your refrigerator’s instructions. Pets, heavy kitchen traffic, or construction dust call for inspections and cleaning every 3 to 6 months. A normal home operating environment typically doesn’t need routine coil cleaning. If your household conditions change, such as construction starting nearby, revisit the schedule and consult the Use and Care Guide before cleaning.
Which appliance repair or cleaning services in Pearland clean refrigerator coils?
HomeFix offers Refrigerator Repair in Pearland for problems that go beyond routine maintenance. Coil cleaning depends on your model: some refrigerators don’t require it, and others can only be cleaned by a certified technician. If the appliance has a mechanical or electrical problem, HomeFix can perform on-site diagnostics to identify the issue. Check the model’s Use and Care Guide for the appropriate coil-cleaning instructions.
Does Pearland’s humid or dusty climate affect how often refrigerator coils need cleaning?
Base the schedule on dust and activity around your refrigerator, rather than assuming Pearland’s climate alone sets a cleaning interval. Homes with construction dust, pets, or heavy kitchen traffic should inspect and clean coils every 3 to 6 months. In a normal home operating environment, routine cleaning isn’t typically needed. Check the Use and Care Guide for model-specific instructions, and adjust your reminder if household conditions change.